


Elden Ring Nightreign is almost here! It launches tomorrow, with new From Software-designed bosses and challenges to take on in The Lands Between. Though it retains the From Software action at its core, it’s a roguelite experience, meaning it plays unlike anything the studio has made before. As such, this game has lots of “new” to pick up on. Fortunately for you, my colleague Alex Van Aken and I (read my 8 out of 10 review here) have put more than 60 hours into the game, and we’ve rounded up the best beginner tips and tricks for anyone jumping into Elden Ring Nightreign.
Elden Ring Nightreign: Beginner Tips and Tricks
- All armament attributes and buffs affect your character, EVEN WHEN UNEQUIPPED
- Notice those caps? We can’t emphasize this point enough. Every weapon you pick up features unique buffs and effects, ranging from things like increased ranged or holy damage to increased attack under specific circumstances. For the most part, these effects will be applied to your character as long as the armament is in one of your item slots.
- The exception to this rule is any armament with a red hand symbol attached to an effect in its description. If you see this red hand, it means you must have it equipped and in use to receive the effect. You’ll know it’s working because you’ll see a white hand symbol instead of the red hand when it’s utilized.
- Get to Level 2 quickly – it makes a massive difference.
- When you land, you will pretty much always drop into Limveld by a small camp that’s not marked on the map. Defeat all of the enemies here and head to the nearest Site of Grace to level up. Reaching Level 2 requires very few Runes, and the difference between Level 1 and Level 2 is massive – it’s the difference you’ll need to take on the points of interest actually marked on your map.
- If you can level up, a flashing light-blue arrow will appear next to the level indicator in the top left corner of your UI.
- It’s also a great idea to memorize how many Runes are needed to go from Level X to Level Y so you can do the mental calculations on the fly.
- Use spectral trees to fly around the map quickly.
- On your map, you will see blue spectral trees with wind-like streams flowing out of them. The wind stream indicates the direction this tree will take you, and interacting with the tree in-world will cause a spectral eagle to pick you up and, if you don’t touch anything, drop you off at the end of the wind stream path on the map. You can use the on-screen button prompts to either descend quickly with the eagle or have it drop you altogether.
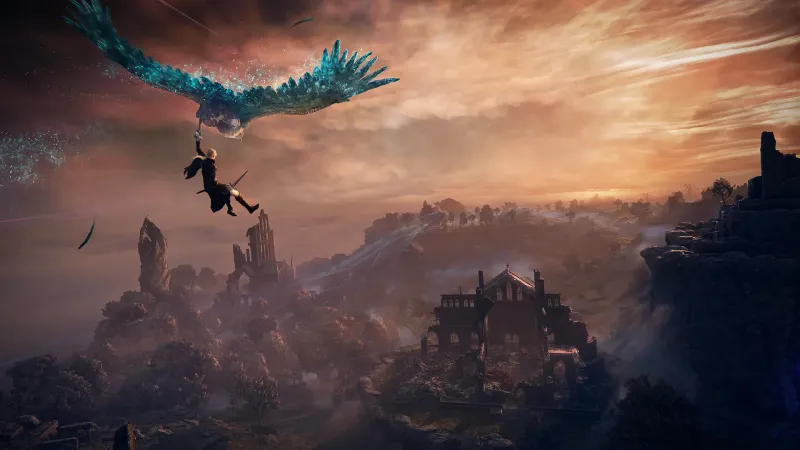
- When using the spectral tree eagles, don’t touch your left stick.
- Doing so will throw the eagle off its flight path, leading to a quick end for your flight. Don’t press anything to travel the full distance.
- Another great way to traverse the map quickly is via Slipstream Jumps.
- On your map, these jumps look like blue flames, and when you reach them in-world, that’s what they look like too. Hop into them and press the jump button to launch into the air. You can direct where you land using the analog sticks – these jumps are useful for climbing up cliffs quickly, reaching new areas, or pulling off u-turns mid-air to get somewhere else. You can also use them to cover distance quickly, which is especially useful for escaping the storm.
- Visit churches to increase your flask charge count.
- On your map, you will see orange-gold churches. Visit these to increase your flash count by one. After visiting a church, its symbol on your map will turn grey, indicating that you’ve already obtained the flask charge increase there.
- When you reach a church, your character will also be fully healed when accepting the additional flask.
- This is a great thing to keep in mind if you have to head into the storm to reach a church, as your health will be restored, giving you more of a fighting chance against the storm’s damage.
- Use your Evergaol Keys on Day One.
- Using an Evergaol Key to open an Evergaol on the map will spawn a random boss to fight. If you do this on Day One, the boss will only have half of its health, which you’ll notice when you see half of its health bar greyed out. If you open an Evergaol on Day Two, the boss will have two-thirds of its health, making it a tougher fight.
- Most points of interest have multiple entry points.
- Utilize these different entrances to take down points of interest quicker, like the basements of castles and forts.
- If you see the merchant that looks like the Equillibrious Beast (colloquially known as Libra), speak to it.
- It offers bargains, such as giving you a “powerful weapon” at the cost of two levels (trust me: it isn’t worth it because I received a grey weapon from this once and it was devastating) or boosting dexertity at the cost of limited FP (an excellent choice for the Ironeye, who has a Dexerity affinity and little use for FP).
- Ninety-nine percent of the time, it’s worth it to complete the Shifting Earth events on the map.
- These will unlock as you beat more Nightlord bosses, and you won’t have one on the map until you beat the first Nightlord boss. The first one you’ll unlock is the volcano event, and it’s one of the best to complete. Heading down into the volcanic area leads to a fight against a Magma Wyrm. Defeating this boss gives you an upgrade that takes any weapon of any rarity to Legendary (gold) status. The other events are great too, like the Scarlet Rot Forest, which features a blessing that yields an immunity to Scarlet Rot, increased HP, and activates a health mechanic similar to Bloodborne’s Rally mechanic.
- Complete the Remembrances.
- These will unlock the longer you play each Nightfarer, and they are specialized quests for each character. Only one person in a trio can have one active. The earlier quests require you to beat a special boss on the map, but later Rememberances require beating the final boss, which is much tougher. Either way, completing Rememberances gives you excellent character-specific Relics to equip.
- Always seek out points of interest marked with the elemental damage type that’s effective against the Expedition’s Nightlord.
- When selecting an expedition, you’ll see what elemental damage type the Nightlord boss is weak to, noted by a symbol of the element next to “effective.” You can also read the Nightlord’s description for another hint about the effectiveness of this elemental damage.
- If you see a red spectre on their knees in Limveld with the item marker on it, interact with it to receive a bunch of loot.
- These are the spectres of other players who have died, and you can see which character they were playing as, and you’ll notice their loot is themed around that as well.
- If you find an Ironeye spectre, for example, you’ll see that their weapons are marked with “The Ironeye’s Grief” or “The Ironeye’s Revenge.” If you’re playing Ironeye, you should pick these up as they directly increase Ironeye’s scaled affinities like Dexerity.
- Check back in with the Jar Merchant in the Roundtable Hold periodically.
- His shop updates throughout your journey to include additional Relics, such as character-specific ones, and more.
- After beating two Nightlord bosses (or in other words, successfully completing two Expeditions), head to the new mirror icon on the Roundtable Hold map.
- Here, you can purchase additional outfits for your Nightfarers using Merk, the same currency used to purchase things from the Jar Merchant.
- Upgrade grey rarity weapons to blue using Smithing Stones.
- You can find these basic Smithing Stones out in the world or by purchasing them from merchants scattered about the map for 6500 Runes. The upgrade bench is always by the merchant.
- Upgrade blue rarity weapons to purple using upgraded Smithing Stones.
- To find these special Smithing Stones, head into the mines on your map and sprint through until you find the Golem miniboss. Defeat it to receive the type of Smithing Stone needed to upgrade your blue rarity weapons to purple rarity.
- You can quickly mark items and places on the ground by holding Triangle/Y and pressing R3/RS.
- The corresponding symbol and color will indicate who on your team made the mark.
- If you run into the Flame Chariot world bosses, you can dispatch them extremely fast by double jumping onto their head and pressing R1/RB.
- When you double jump onto the top of their heads or nearby, pressing R1/RB should activate a critical hit (the same move that allows you to stab enemies in the back). This critical hit instantly kills them, which is faster than the critical hit achievable by stabbing the chariot drivers in the back.
And that’s all of our beginner tips and tricks for you before heading into Elden Ring Nightrein. For more, read Game Informer’s Elden Ring Nightreign review, and then check out this Elden Ring Nightreign launch trailer that summons the power of Evanescence.
If you have any tips or tricks not listed here, drop them in the comments below for your fellow Nightfarers heading into The Lands Between!


